FREE Sample Pack >

how to cut porcelain slabs

The porcelain slabs that we supply here at PrimaPorcelain come in a range of standard sizes including, 40cm x 80cm, 60cm x 60cm and 20cm x 120cm. However, when it comes to laying your new porcelain paving in your home or garden, you may need to cut the slabs down to fit in a certain gap or around an existing feature. In this blog, we'll talk you through the equipment you'll need and the method you should use to cut your porcelain slabs up safely. Our full installation resource can be found here

To cut porcelain slabs, you will need:

  • A circular saw
  • Durable cutting blade
  • Gloves
  • Safety goggles
  • Mask

1. Safety precautions

Before you start cutting your porcelain slabs, it's paramount that you take the necessary safety precautions. While cutting your porcelain slabs, you may see flecks of stone and dust in the air. These can be dangerous because they might a) hit you at force and cause an injury or b) enter your lungs and cause irritation. Therefore, you should make sure that you have and use appropriate personal protective equipment (listed above) before cutting your porcelain slabs. 

2. Choosing a circular saw

Here at PrimaPorcelain, we recommend the Rubi TC-180 circular saw which is designed for cutting porcelain. This comes with two different blade options, the dry blade (model number Rubi TCR31975 180mm), or the wet blade (model number Rubi CPC230955 180mm).

3. Choosing the right blades

Porcelain slabs are notoriously hard and dense, which means a regular circular saw might not be capable of slicing through them. Cheap blades will wear down very quickly and are far more likely to chip or shatter your porcelain slabs as you make your cuts. We'd recommend investing in a high-quality diamond blade for your circular saw. This will ensure that the cuts are clean and will reduce the likelihood of broken or damaged tiles.

We often recommend that our clients use a wet blade to cut their porcelain slabs because this method allows the most precise cuts. The water keeps the blade cool while it cuts through the tough material, this means there's less friction which means less chance of a crack or split. 

Cutting the tiles

To cut your porcelain slabs accurately, we'd recommend marking where you need to cut. This ensures that you get a straight and precise finish. Line the circular saw up with your pre-drawn mark and begin to cut down into the tile, applying light pressure.

One of the biggest tips we can give you is to take your time! Porcelain slabs are notoriously hard and brittle and will begin to chip if you cut too deep too quickly. Ideally, you'll be using a wet blade which, as we've previously mentioned, will help to keep the blade cool as well as making for a cleaner cut. 

If you want to cut your porcelain tiles along a curve or radius, you may need to use a hand-held circular saw rather than a fixed one, to allow you to create a contour as you cut. This method is perfect if you have garden features that you need to work around. 

Shop Porcelain Tiles Now!

Hopefully, this guide will help you cut your porcelain tiles in a safe and accurate manner. Feel free to give us a call if you have any questions about installation - 029 2080 3756.

How to Lay Slabs

So, you've got your new design plans sorted and bought all of the materials that you need for your new floor, all that's left is to lay your slabs. Of course, the easiest option to choose is to hire an installer to lay them for you, but if you're running on a tighter budget and want to install them yourself, there may be some questions you're asking yourself. How long does it take? What do you lay patio slabs on? Well, here's what you're going to need to do! 

First things first, you're going to want to make sure that you have all the tools and materials sorted. Here's a list to double-check you have everything in place.

Tools Needed to Lay Patio Tiles

  • Trowel 
  • Rake
  • Wheelbarrow 
  • Rubber mallet
  • Shovel 
  • Tape measure 
  • String line and pegs (optional)
  • Cement mixer (optional) 


Materials 

  • Paving slabs 
  • Sand (sharp) 
  • Cement 
  • Sub-base aggregate 


Step-by-Step Guide to Laying Patio Tiles  


Prepping the area

Before you can even think about laying your new paving slabs, you will first need to prepare your patio area. Here, you will need to dig a depth of around 150mm across the whole area where your patio will be, ensuring the soil is evenly compacted. Once this has been done, you can begin to tip the sub-base in, raking it into a consistent depth of 100mm. You need to make sure that it is smooth, flat and firm. 

Getting the concrete ready 

Next, you'll need to create a concrete mix of three parts sand and one part cement, adding water to create a dough-like consistency. To do this, you can either use a cement mixer or a target bucket. Once done, to check that the mix is thick enough, pick some up and mould into a ball. When you let go, it should keep its shape without water oozing out of it or falling apart. Ensure you have mixed enough concrete to make an even 40mm layer in the patio bed. 

Laying the patio slabs

Before you can begin to lay your slabs, it's important to dampen them so they don't dry out your concrete too quickly. Once this is done, you can lay your first slab. Slowly lower your slab in position into the concrete mix and gently tap it with a rubber mallet in order to fix it into place. In ideal terms, you'll want your slabs to sit around 15mm into the mortar. Repeat this process with the remaining slabs, leaving a 10-15mm gap between each one until your patio bed is covered. After all of your slabs are laid, spray the entire areas with water until it's completely saturated and leave it to set for a minimum of 24 hours. 

Finishing touches 

The last part of laying your slabs involves applying the finishing touches. Here, use a trowel to fill the gaps between your slabs with a suitable grout, ensuring that no residue is left on the patio's surface. Clean away any other mess that may be laying on top of your slabs and leave to set.


Dry-Installing Your Paving Slabs 

The above method is what is traditionally used by the majority of patio installers. However, thanks to PrimaPorcelain's revolutionary pedestal support system, you are able to make the installation process even easier, with no mess whatsoever - laying patio tiles has never been easier! Eliminate the need for traditional adhesives and mortar such as cement and lay your slabs onto our state-of-the-art pedestals.

Here, your slabs can be laid immediately, with absolutely no drying-out time needed! You can even run any necessary cables and wires underneath if you have any special features in your garden - perfect! One of the great things about our pedestal supports is that if you ever feel like moving your slabs, all you need to do is simply lift them up and relocate without having to dig them up. You can find out more about our pedestal support system below. 

Pedestal Support System >


For more information on how to lay patio tiles or what you should lay your patio slabs on, please do not hesitate to get in touch with a member of the PrimaPorcelain team today by calling 02920 803756 or emailing us at info@primaporcelain.co.uk

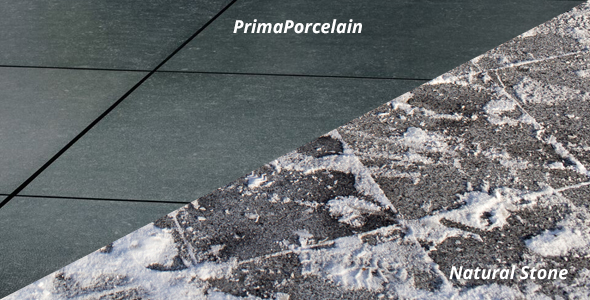
Here at PrimaPorcelain, we're pretty confident that by now you would all have a fairly strong understanding about porcelain and how we believe it is a superior flooring option to its natural stone counterparts. But do you know how porcelain paving is made to make it a better choice? If not, we are here to tell you! 
How is Porcelain Paving Made


The Manufacturing Process

Porcelain is manufactured using a mixture of sands, clays and other important minerals such as feldspar, which are then baked in a high-temperature kiln. Before the unbaked mixture is sent to the kiln, there is a lot of preparation that is required, followed by a fair bit of post-firing work to ensure the product that is sent out to trade is of a high enough quality and standard. Below we will look at each of these important stages to how porcelain paving is made.

The ingredients 

To create the base mixture for porcelain, four ingredients (plus water) are commonly used. These are:

  • Feldspar - A granitic mineral from a variety of sources 
  • High-quality fine clays sourced from Italy, Germany and Turkey 
  • Kaolin - Also known as China Clay in Britain and Ireland, sourced from Ukraine 
  • Quartzitic sand - A very pure and fine sand sourced from Germany 

Preparation 

Very specific quantities of these materials are mixed together with clean, cold water into a slurry, which is then processed in a ball mill to decrease the materials into very fine particles. These particles are so fine the finished product seems like a slippery mud with no discernible grittiness. If you were to rub it between your fingers, it would feel like a fine lubricant, leaving a soft streak across your skin. 

Drying

In this muddy form, the mixture of materials is very easy to move around, however, the majority of the water content has to be removed before the mixture can be taken any further. This is performed via a screen drier which utilises hot air and gentle rotation to decrease the moisture levels to approximately 6%. The water that is recovered can then be re-used to create a new initial mixture to keep wastage levels to an absolute minimum. 

Storing the Mix 

Once the water is removed from the mixture of materials, the dry-ish powder is then kept in a silo until it is required. Different mixes are kept in different silos, with up to 80 silos being held in certain manufacturing plants. Each of these silos holds a slightly different mix, with more or less clay, or a higher proportion of kaolin, for example. 

Blending

The next step of the process sees the mixture stored in silos being blended within specialised 'blending towers'. Each tower takes precise quantities of particular mixes from a variety of silos and creates a blend specific to the product that is being manufactured. For example, darker-coloured porcelain might contain more content from silo 19 and less from silo 26, while lighter-colour porcelain might use more from silo 11 and less from silo 7. The secret to producing high-quality porcelain lies in blending the perfect quantities of various mixes to produce the ideal 'biscuit' ready to be baked.  

Pressing 

The blended powder coming from the towers is then pressed into moulds. Some of these moulds will be smooth with zero surface relief, others will have specific textures or profiled surfaces. Some will be produced in a square-shape, others rectangle. Some will be small, some will be large. The blended powder is subjected to huge amounts of pressure, compacting it into the specific mould, so much so that it turns into a fairly hard material, similar to a biscuit before it is fired in the kiln.

Drying

After pressing, the moisture content of the 'biscuit' is reduced even further from the previous 6% to just 1-1.5% by passing it through another drier, again recovering the water to re-use. The material which emerges from this process is very noticeably harder, tougher, crisper and requires a tough more effort to snap into two pieces.

Finishing Touches 

After the material is dried, it is then coloured or printed on and placed in the kiln to be fired. Here this material is carried into the fierce heat of the kiln for around 100 meters, with temperatures reaching as high as 1,200 degrees celsius before going through an equally finely-controlled cooling stage. This cooling stage is just as important as the heating in producing a quality porcelain paver. Once this is over, the tile is then sized to the correct measurements and given additional treatments such as sealants, wax or protective coating before being checked over once more and packed up to be delivered to trade. 

This completes the process of how porcelain paving is made. A very delicate process which requires particular attention and detail at each stage. The finished product is a flooring material that offers extremely low-maintenance properties, high resistance to all fading, scratches and stains and overall premium-quality finishes. A material that is long-lasting and gorgeous to look at! You can browse our full collection of porcelain products by clicking below. Order your FREE sample to get a close-up look and see the quality for yourself. 

Browse Porcelain Paving >


For more information on our range of porcelain products, be sure to get in touch with a member of the PrimaPorcelain team today!

Textured non-slip porcelain paver

It rains a lot in this country. If you live in the UK and you have a garden, that garden of yours is frequently going to get wet.

This is nothing new, but it is something to bear in mind when you're shopping for outdoor tiles. Your patio will need to be capable of withstanding Britain's infamously wet weather, but perhaps even more importantly, you need to know that your paving won't get too slippery after a shower.

After all, you don't want to slip and hurt yourself when you're trying to relax and enjoy your garden!

More...

Outdoor Floor Tiles

Having outdoor floor tiles can save you a lot of work - certainly when compared to other materials commonly found in the garden.

And PrimaPorcelain's outdoor tiles are an especially fine choice! Once the paving slabs are laid, your work is more or less done - our products require very little maintenance and will last for years whatever the weather brings. When you compare this to other popular forms of flooring, you soon see the benefits of having our stunning porcelain paving.

More...